Removing Bad Words from Posts

This post is for my social network course and is assuming you have enrolled and reached the relevant section. If you haven’t yet enrolled in the course, click here to enrol.

So a real short tutorial now. To remove certain words from a post (for example, bad language), you can just use these lines:

$body = "This is my post";

//Words to remove
$fowlWords = array("hello", "goodbye", "dogs", "cats");

//This replaces all occurrences of the above words with '*****'
$body = preg_replace('/\b('.implode('|',$fowlWords).')\b/','*****',$body);

In this example, if you input:

“hello everyone I love dogs”

It will be output as:

“***** everyone I love *****”

You can put this in your submit posts function just before you insert the post into the database 🙂

Check out my Facebook page for more tutorials, tips and tricks as well as information about upcoming courses! 

Radio Checkboxes in PHP

Checkboxes

There are certain situations that require the use of checkboxes. For example, you could have a checkbox for “I accept the terms and conditions” or “Keep me up to date with promotions”.

There are certain situations however, which would be better suited to a radio button. A radio button is just a checkbox in which only one value can be checked. For example, you might have a radio button for male or female. If the male button is checked, the female one becomes unchecked. In this tutorial I’ll show you how to use both.

Checkbox

Add your checkbox to your <form> block:


<form action="" method="post">
    Do you accept the terms and conditions?
    <input type="checkbox" name="terms" value="Yes" />

    <input type="submit" name="submit" value="Submit" />
</form>

And then your form handler:


<?php
if (isset($_POST['submit'])) {

    if(isset($_POST['terms']))
    {
        echo "Checkbox was checked!";
    }
    else {
        echo "Checkbox was NOT checked!";
    }
}
?>

Radio buttons

Add the radio buttons to your <form> block:

<form action="" method="post">
    <input type="radio" name="myRadio" value="male">Male
    <input type="radio" name="myRadio" value="female">Female

    <input type="submit" name="submit" value="Get Selected Values" />
</form>

And finally your php handler:

<?php
if (isset($_POST['submit'])) {
    if(isset($_POST['myRadio']))
    {
        echo "You have selected: " . $_POST['myRadio'];
    }
}
?>

This will output “You have selected: male” or “You have selected: female”. Alternately, you could handle it by checking if they selected male or female:

<?php
if (isset($_POST['submit'])) {

    //Check if the radio was set i.e. if any if the radios have been selected
    if(isset($_POST['myRadio']))
    {

        if($_POST['myRadio'] == "male") 
        {
            echo "You selected male";
        }
        else 
        {
            echo "You selected female";
        }
    }
}
?>

You can use this value in your MySQL queries just like you would do with any other post variables:

$gender = $_POST['myRadio'];
INSERT INTO users VALUES('$name', '$age', '$gender');

So that’s it really, both super easy to use! 🙂

Check out my facebook page for tutorials, tips and tricks!

Reece

Expanding image sizes on the newsfeed when clicked


Expand feature

This post is for my social network course and is assuming you have enrolled and reached the relevant section. If you haven’t yet enrolled in the course, click here to enrol.

For this tutorial, you should already have completed the video which shows you how to incorporate uploading images to the newsfeed.

Let’s implement a little feature where the images on the newsfeed are smaller, but when clicked, increase in size.

So in your css file, we already added this style to the uploaded images:

.postedImage img { 
    max-height: 300px;
    max-width: 100%; 
    display: block; 
    margin: 5px auto;
}

All you need to do is change the max-height value to be a smaller value such as 100px:

.postedImage img {
    max-height: 100px; //Change this (makes image smaller)

And then also add a new css style to your file:

.postedImage img.large {
    max-height: 300px;
}

Which means, any .postedImage img where the img also has the class large will have a max-height of 300px.

Finally, just add this JQuery to your javascript file:

$(document).on("click", ".postedImage img", function() {
    $(this).toggleClass("large");
});

What this does is when the image is clicked, it will toggle the class “large”. Toggle class means if it already has the class “large”, it will remove it, if it doesn’t have the class “large” it will give it the class. If it gives it the class “large” then the css that we added above with the larger height kicks in 🙂

In the above JQuery code, this refers to the element which was clicked (which in our case is the image). Putting this inside of $() is how we create a JQuery object from an html element. By creating a JQuery object, we are able to use all the JQuery functions (e.g. toggleClass).

The very last thing to do is just to prevent the comment section from opening when the image is clicked. In Post.php inside our loadPostsFriends function, change this:

if (!target.is("a") && !target.is("button")) {

To this:

if (!target.is("a") && !target.is("button") && !target.is("img")) {

This just says ‘and when the target is not an image’.

Check out my facebook page for tutorials, tips and tricks!

Reece

How to debug a MySQL query

One of the most frequent issues I hear about from students who take my course, is that their MySQL queries are not working. More specifically that their code won’t insert or update the data in the tables. 9 times out of 10, students find their problem by using this one technique:

So you have the following query which is supposed to insert the data into the table:


$query = mysqli_query($this->con, "INSERT INTO friendRequests VALUES('', '$user_to', '$user_from')");

For some reason this isn’t working and you have no idea why. Well you can find the problem by simply echoing the query string and then executing it from the SQL tab of PhpMyAdmin.

Step 1 – echo the query string:

So the first thing you need to do is echo the query string. By this I mean, only echo the query part. So put your echo command above your mysqli_query part like so:

echo "INSERT INTO friendRequests VALUES('', '$user_to', '$user_from')";
$query = mysqli_query($this->con, "INSERT INTO friendRequests VALUES('', '$user_to', '$user_from')");

Note: Again, I am only echoing the query string, not the whole mysqli_query part. This is what NOT to do:

echo mysqli_query($this->con, "INSERT INTO friendRequests VALUES('', '$user_to', '$user_from')");

Step 2 – refresh the page

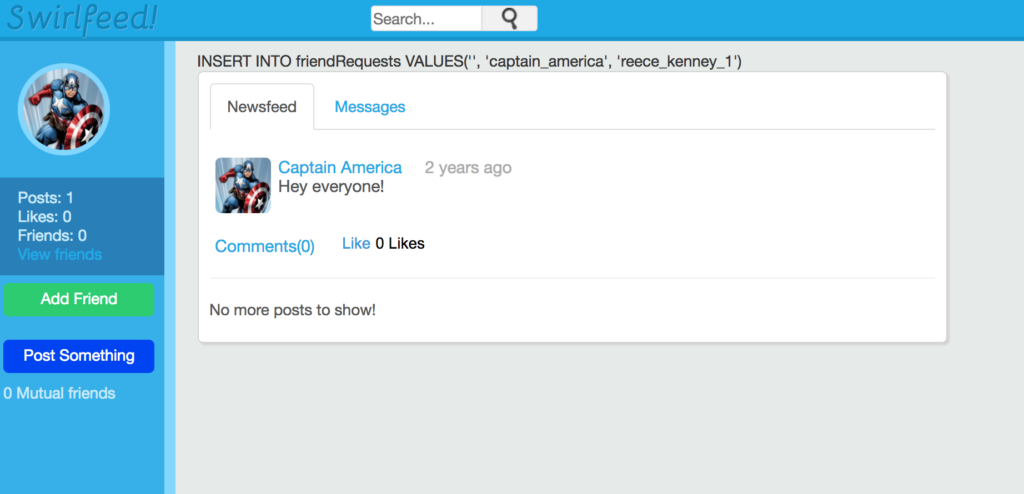
When you save, refresh the page and execute the query again, you should now see your query echoed onto the page somewhere. For example, I just sent Captain America a friend request and saw this:
Debug Queries

Step 3 – execute the query in PhpMyAdmin

When you see your query on the page, copy it and paste it into the SQL tab of PhpMyAdmin.

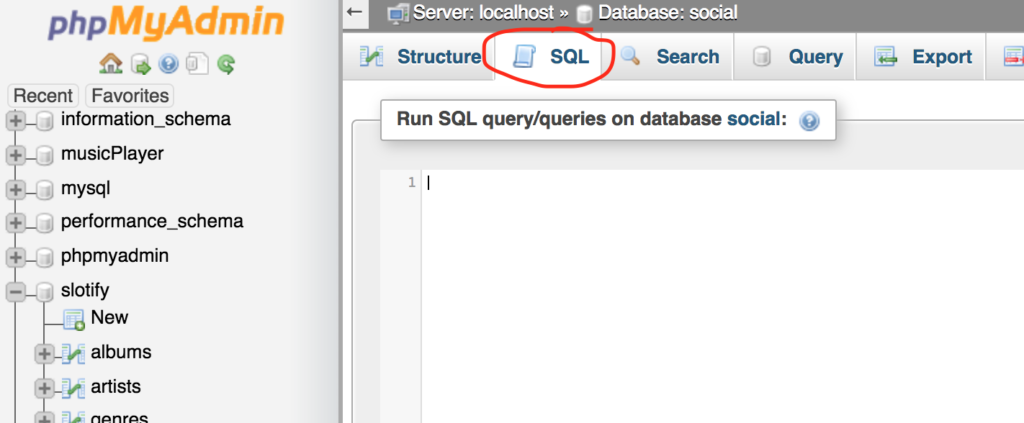
So go to localhost/phpmyadmin find your database, and then click on the sql tab:

SQL Tab

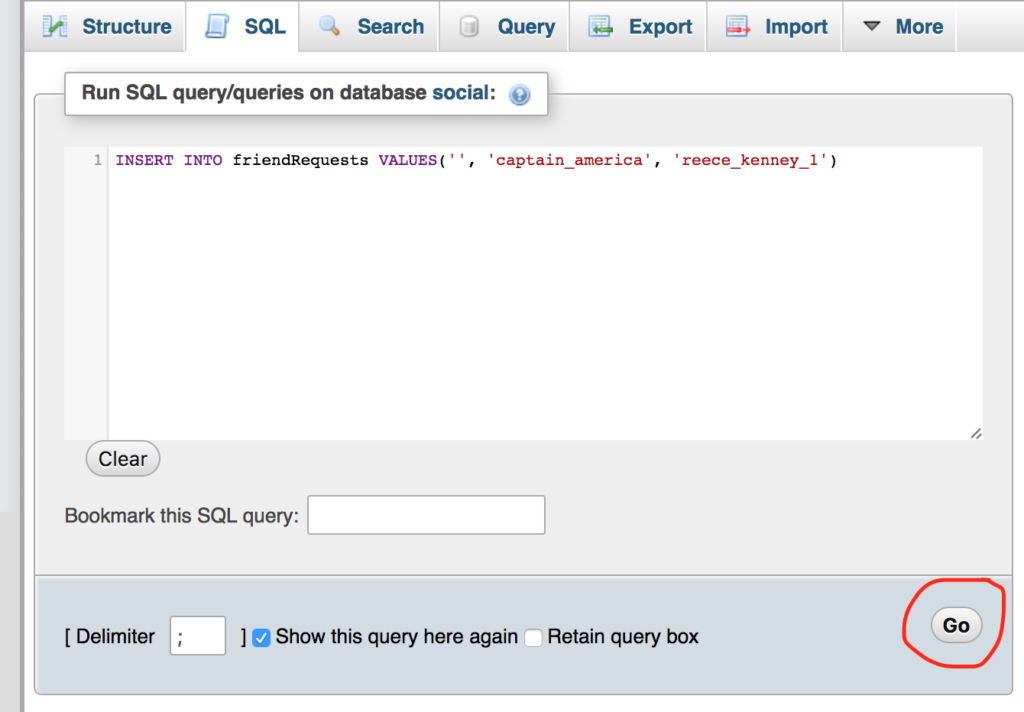
Next you just paste it into the text area and then click Go in the bottom right corner:

Go button

Finally, you should see an error appear. Look at the ‘MySQL said’ part for the error itself:

Error Image

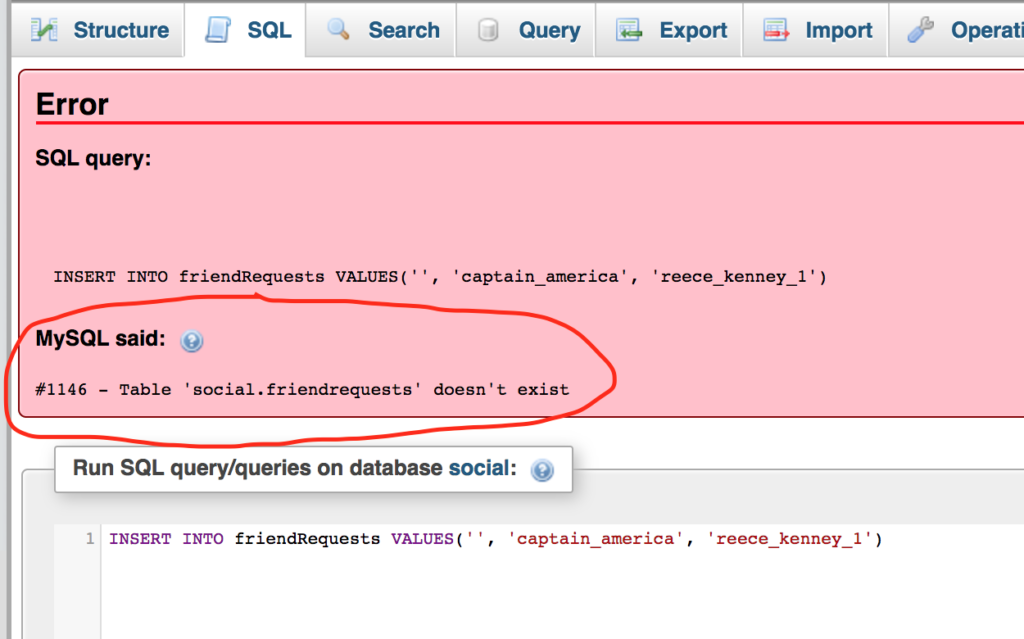
So in my example above, I can see that the problem is with the table name. I have used the name friendRequests in my query, but after looking at the table name in PhpMyAdmin, I noticed that my table was actually called friend_requests

Hope this helps! I still use this technique every time I have a problem with SQL and it works almost 100% of the time! 🙂

Check out my facebook page for tutorials, tips and tricks!

Reece

Brief Introduction to Localisation (offering multiple language support)

Languages image

To support multiple languages you will want something called localisation. Localised files will contain the translations for all of your strings across your site. For example, you might have the following localisation file for English:

English.php


<?php
class English {
    public static $signUpText = "Sign up!";
    public static $logOutText = "Log out!";
}
?>

You may have the same file but for Spanish:

Spanish.php

<?php
class Spanish {
    public static $signUpText = "¡Regístrate!";
    public static $logOutText = "Cerrar sesión";
}
?>

Notice how both of the files have the same variable names but the values are different. These files would of course contain all of the translations for all strings in your site.


On your site, if you need to display the sign up text, you would first check the user’s language setting. If they have english set, you would use:

echo English::$signUpText;

If they have spanish set, you would use:

echo Spanish::$signUpText;

Note: In the above examples, the English and Spanish classes are not object instances so we use double colon :: to echo the values. When you create an instance of an object e.g.

$myObj = new SomeClass();

we use the arrow e.g.

$myObj->someVariable;

Well, this was a very brief introduction to localisation.
More to come on this topic soon

Reece

Friends List Page

Result with style

This post is for my social network course and is assuming you have enrolled and reached the relevant section. If you haven’t yet enrolled in the course, click here to enrol.

I’ve had a lot of requests for a friends list page. So, here it is! 🙂

We will start by creating a function which will return an array of the users friends. In User.php, create the following function:


    public function getFriendsList() {
		$friend_array_string = $this->user['friend_array']; //Get friend array string from table

		$friend_array_string = trim($friend_array_string, ","); //Remove first and last comma

		return explode(",", $friend_array_string); //Split to array at each comma
	}

Next, create a new file called friends.php on that page, copy and paste the following code:

<?php
include("includes/header.php");

//Get username parameter from url
if(isset($_GET['username'])) {
	$username = $_GET['username'];
}
else {
	$username = $userLoggedIn; //If no username set in url, use user logged in instead
}
?>

<div class="main_column column" id="main_column">

</div>

What we’ve done here set up an empty page which takes a username parameter in the url e.g. friends.php?username=reece_kenney

Next we are going to add the code which calls the getFriendsList function we created above. Inside of the

div, add the following code:

<?php
$user_obj = new User($con, $username);

foreach($user_obj->getFriendsList() as $friend) {

	$friend_obj = new User($con, $friend);

	echo "<a href='$friend'>
			<img class='profilePicSmall' src='" . $friend_obj->getProfilePic() ."'>"
			. $friend_obj->getFirstAndLastName() . 
		"</a>
		<br>";
}
?>

Refresh the page and you should see a list of the users friend along with their profile image:
Result with no style

It doesn’t look great, so just add the following code to your css file:

img.profilePicSmall {
	height: 40px;
	width: 40px;
	border-radius: 25px;
	margin: 5px; 
}

Now it should look a little better! 🙂
Result with style

Check out my Facebook page for more tutorials, tips and tricks as well as information about upcoming courses! 

Canceling a Friend Request

This post is for my social network course and is assuming you have reached the relevant section. If you haven’t yet enrolled in the course, click here

So one feature that hasn’t been implemented until now is the ability to cancel friend requests. For example, if I accidentally send someone a friend request, I have no way of cancelling it. This is actually really easy to fix and essentially all we need to do when they click the cancel request button is remove the request from the ‘friend_requests’ table.

Open profile.php and find the line of code which outputs our ‘Request Sent’ button. It should look like this:

else if ($logged_in_user_obj->didSendRequest($username)) {  
    echo '<input type="submit" name="" class="default" value="Request Sent">';  
}

Give the name attribute a value such as name=”cancel_request”. We need this name attribute so that we can handle the button press.

 
else if ($logged_in_user_obj->didSendRequest($username)) {
    echo '<input type="submit" name="cancel_request" class="default" value="Request Sent">';
}

Next, add the handler for the button at the top of profile.php (underneath all the other handlers):

if(isset($_POST['remove_friend'])) {
    $user = new User($con, $userLoggedIn);
    $user->removeFriend($username);
}

if(isset($_POST['add_friend'])) {
    $user = new User($con, $userLoggedIn);
    $user->sendRequest($username);
}

if(isset($_POST['respond_request'])) {
    header("Location: requests.php");
}

if(isset($_POST['cancel_request'])) {
    $user = new User($con, $userLoggedIn);
    $user->cancelRequest($username);
}

What this does, is when the cancel_request button is pressed, it creates an instance of the user object and then calls the ‘cancelRequest’ function (which we haven’t created yet). This function will take a parameter which is the username of the person that you sent the request to (AKA the username of the profile you are currently on). Scroll to the top of profile.php and you will see us create this $username variable.

And finally, add the cancelRequest function to the User.php class:

public function cancelRequest($user_to) { 
    $user_from = $this->user['username']; 
    mysqli_query($this->con, "DELETE FROM friend_requests WHERE user_to='$user_to' AND user_from='$user_from'"); 
}

All this function does is delete from the requests table where the user the request was sent to is the profile user (which we passed into the function) and the person who sent the request is us.

That’s it! That’s all there is too it! 🙂

Reece